Saturday, November 13, 2010

Crayon Roll Tutorial

I have seen these crayon rolls all over the place and have wanted to make some for my kids for quite some time. I finished their quiet books and had some fabric left over from the covers, so I decided now was the time to try.
I looked at several ideas online but ended up making up my own to fit what I wanted.
To make a crayon roll that will hold 10 crayons
Here is what you need:
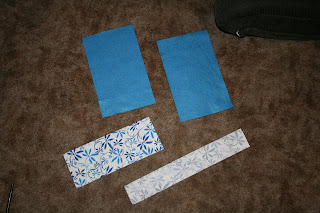
Front piece: 11.5" X 7"
Back piece: 11.5" X 7"
Pocket: 11.5" X 9"
Outer decor & closure strap: 8" X 5"
Interfacing pieces:
11.5" X 7"
11.5" X 4.5"
8" X 5"
For mine I used the solid blue for the front and back and the print fabric for the pocket and strap [Interfacing not shown]
I also used 1/2" seam allowance on the "insides"
and a 1/4" allowance on the "outside"
Step 1: Cut out pieces (see sizes above)
Step 2: Fold decor piece in half with right sides together (long ways- so it should be 2.5 X 8) and iron.
Step 3: Fold pocket piece in half with wrong sides together and iron (should end up being 11.5 X 4.5)
Step 4: Sew along one short edge and the long edge of decor piece (leave third edge open)
Step 5: Turn right side out and iron flat.
Step 6: Sew along the outside of your decor piece
*I also sewed down the middle of my piece in three places to add decorStep 7: Place 11.5 X 7 piece of interface on table. Top with front piece (right side up)
Step 8: Place 11.5 X 4.5 piece of interface inside of pocket piece and lay ontop of front piece.

Line up along the sides and the bottom edge. The fold of your pocket piece should be at the top.
Step 9: Find the center of your pocket piece and draw a line from top to bottom of pocket (I just used a really like pencil line)
Step 10: Measure 1 inch from your center line and continue marking lines to the right and left of the middle.
You should end up with 9 lines.
The end sections should be 1.75" wide
Step 11: Starting at the top of your pocket BACK STITCH and then sew along the lines you just created.
I started from the center and worked my way out.
*Be sure to back stitch to provide a steardy pocket!! (I went over each end about three times!)
After this step I seem to have gotten too wrapped up in what I was doing and didn't take pictures...SORRY!

Step 12: Sew decor piece onto middle of back piece- matching the raw edge of decor piece with the edge of the back piece. (The excess piece that hangs past your back piece should be the finished edge and will become your strap)
Step 13: Fold strap piece in to back piece (matching up at the edge) and pin.
Step 14: Lay back piece ontop of front piece (Right sides together) and sew all the way around- except leaving a few inches to turn
[I left my opening at the top so I could secure the decor strap and pocket piece into place!]
Step 15: Clip corners (remembered this picture!)
Step 16: Turn right side out
Step 17: Unpin strap
Step 18: Iron flat and fold in unsewn edge
Step 19: Pin unsewn edge
Step 20: Sew around entire project
Step 21: Add crayons and...
ENJOY!!!
Closed view!
[I sewed a button onto the front to cover up the ugly velcro mark that I had made on the strap]
Hopefully these will keep the kiddos occupied in church tomorrow!!
Of the plain color I used a piece of fabric that was 13" X 15"
Of the decor fabric I used a piece that was 17" X 9"
Hope this helps

Thursday, November 11, 2010

Quiet Book- part 2

Phase 2 is complete.
I still have more ideas that I will probably want to add in the future, but for now I think this will give the kids a great start!
Here is the rundown of the new pages!
BOOK ONE
Page 9: Barn
Idea and template: Homemade by Jill
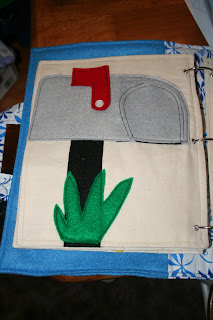
OutsideFinger PuppetsE-I-E-I-OPage 10: Mailbox
Idea and template from: Homemade by Jill
Complete with door that opens to put mail inside and moveable flag
Page 11: Mail bag
My idea/template
Comes with actual letters to mail!
Mail idea from: Lu Bird Baby
My template
MAIL IS HERE!!
Page 12: Fix my hair
Idea from childhood quiet book
Own template
Little bag underneath holds hairties and bows
In part one there were two pages that I needed to fix the animals on to make them bigger and more child-friendly. Here are those changes now.
Noah's Ark animals
In the ark- from page 5
Ocean animals- from page 4
Book TWO
Page 9: Button flowers
Flowers detach and reattach from buttons
Idea from childhood book
Own template
Page 10: Pattern Caterpillar
Own template
Shapes from pocket can be arranged to create different patterns
(Four different shapes...with four of each)Page 11: Fancy Fingers
Rings can be placed on thumbs and ring fingers of both hands.
Wrists also come up for bracelets (not shown)
Idea from childhood book
Own template-My daughters hands :)
Page 12: Piggy Bank
Own Template
Buttons also added to the front closure flaps!
FINISHED
WRAPPED
and ready for CHRISTMAS!!


ENJOY!!

Tuesday, October 12, 2010

Quiet Book Pages- Part 1

My quiet book is still a work in progress, but I wanted to post what was completed so far.
I will post tutorials for any pages upon request.
I've attached links to where I found my ideas next to each page. (For those that I found ideas from- THANK YOU for your hard work and wonderful ideas!) I designed my own template unless otherwise stated
I used the idea from quietbook.blogspot to put my quiet book into 3 ring form so that I could interchange and add to it later!
FRONT COVERS:
Flaps velcro to cover for closure
(still looking for adorable buttons to add to flap)
Used idea and tutorial by: creatingbycami
Changes I made included: the overall size, when to add closure flap, added handles, and added pockets on inside.
I LOVED this idea because it put the rings on the INSIDE but still makes it so I can change/add to it later!BOOK ONE
Inside front cover: Pocket for "treasures"
(pieces that may fall out that need to stash quickly, treats, paper, etc.)
Page 1: Clock
Idea from: Oopsey-daisy
Pages 2-3: Counting
Idea from: Little inspirations' ideas Pages 4: Ocean
Idea from: saw several "water themed pages" and just created something to fit what I wanted.
Page 5: Noahs ark
NOTE: I plan to change the animals on these two pages to make them easier to play with and more durable. (Pictures will be posted later)
Ocean opens up as a pocket for storage for the animalswhen not in use.
Flap on front opens so that the animals can go "inside" the ark.
Animals sit in flap/pocket at the top of the ark.
Page 6: Gumball machine color matchng
Idea from: Oopsey-daisy
Template parts from : Oopsey-daisy
(I used template provided on website as a guide but changed it slightly to fit what I wanted)
Page 7: Shapes matching
Idea from: my own childhood quietbook
Gumballs can even "come out" of the door at the bottom
Page 8: Weaving
Idea from: Childhood quietbook
Back cover: Another pocket for "extras"
BOOK TWO
Front Cover
Page 1: Clock
For details see above
Page 2-3: Counting
For details see above
Pages 4-5: ABC/spelling
Idea from: The Thornocks
Letters are stored in pocket and then velcro to page when in use
Pages 6-7: Puzzle page
Idea from: craftychiclyric
Puzzle pieces are stored in pockets and then assembled on black square on right page
Flower puzzle
Heart puzzle
Star Puzzle
Page 8: Weaving
For details see above
Back cover: pocket for extras!
This is all for now....but there is MORE TO COME!!
(Templates for any page available upon request)

Monday, September 27, 2010

I've started something BIG!

Each year for christmas I try to have something homemade by me to give them.
Last year they each got a blanket.

Complete with matching pillow case, baby blanket, and baby pillow!

The year before that was a tutuThis year.....

They will each be getting a QUIET BOOK!

I am SO excited.

The process is well underway and I plan to post picture/tutorials as I go along. Stay tuned for more!!

Saturday, September 11, 2010

All Season Blocks!!!

My mom, sister and I were all together for a week.
We needed projects!!!
That is when I discovered ALL SEASON BLOCKS!
Wouldn't it be nice to have a set of word blocks that you could use for every season? Only one set instead of a set for every single holiday/occassion??
I found this wonderful idea at Sassy Sanctuary
What you will need:
10 blocks (1 used 4 inch blocks)
Paint
Vinyl lettering (or letter cut outs and modge podge)
Vinyl letters needed
Block 1: H Y E D A N
Block 2: A C R S N I
Block 3: R P E T U N
Block 4: V N L O A S
Block 5: E O M D S R
Block 6: S M K I A O
Block 7: T F B W Y E
Block 8: U A G L Y T
Block 9: P J I H O W
Block 10: F P S C U E
Directions:
First you take some blocks (for these we used 4" posts found at lowes and cut them into blocks)
Sand and make smooth
(A HUGE thanks to my dad who did this step for me!) 2: Paint your blocks to match home decor
3: Sand edges (if desired) to give more creative look
4:Cut out letters (Another HUGE thanks to my mom who used her cricuit so we did not have to cut the letters out!)
5:Peel and stick one letter to each side of the blocks according to directions given above
Close up look
Finished product!!
Words you can make with your blocks!
Thanks to Sassy Sanctuary for providing the list!
I've tried to arrange it by time of year. ENJOY!
Love
Love You
Heart
Hearts
Be Mine
Lucky
Lucky You
Irish
Romance
Easter
Bunny
Spring
Spring Time
Flowers
Rainy
Mother
Bloom
Garden
Father
Summer
Pool
Sun
Sunny
Swim
America
Glory
Flag
Freedom
Country
School
Autumn
Fall
Halloween
Ghost(s)
Witch(es)
Monster
Treats
Spooky
Pumpkin
Harvest
Vampire
Fright
Give Thanks
Thankful
Thanks
Turkey
Leaf
Winter
Snow
Let it Snow
Santa
Frosty
Brrr
Believe
Jolly
Merry
Joy
Christmas
Imagine
Snowflake
Flake
New Year
Birthday
Party
Wishes
Christ
Jesus
Peace
Fairies
Fairy
Smile
Dance
It’s a boy
It’s a girl
Welcome
Faith
Hope
Dream
Blessed
Happy
Grace
Wonder
Family
Friends
Home
Kitchen